net.ipv6.conf.default.use_tempaddr = 2
Getting used to IPv6
Some days ago I tweeted my ISP router was assigning me a working public IPv6 address. I don’t know how long it had been that way when I wrote the tweet, but my guess is less than a week. I normally update a few personal repositories each Sunday and push changes in them to Bitbucket. That Sunday, while pushing, I noticed git was adding a few IPv6 addresses to my known_hosts file, which hadn’t happened the Sunday before.
Millions of people are already using IPv6 to access the Internet from their phones and computers, but this is significant because IPv6 adoption in Spain is lagging behind most other countries in Western Europe. My current ISP, Orange Spain, is one of the big players and it’s probably leading IPv6 adoption by number of users, as it’s been deploying it to more and more FTTH clients recently. I don’t know if there’s been a big transition lately or if they’re slowly proceeding by regions.
Obviously, I’m not trying to “sell you” Orange. It’s hated by many and adored by others. In my case it’s doing a good job. I have no complaints so far. I had to call for technical assistance once and they responded properly and fast but your mileage may vary. In any case, I think it’s important to give them (or anyone else) some credit when they do something well, like expanding IPv6 adoption.
Since the day I discovered I was using IPv6, I’ve been reading a bit about it and adjusting my systems and home network to the new situation.
The first topic I read about was how IPv6 addresses worked and the way they are assigned. The best reference I found, as usual, is Wikipedia’s article on IPv6 addresses, and in particular the section about the IPv6 address space and its allocation policies.
Then, I headed to a few IPv6 test pages to see if my IPv6 setup was working properly or if I was to expect problems in some areas. There are quite a few interesting IPv6 test pages, like the one from Google, which is very simple but trustworthy at the same time. There’s also the classic IPv6 test page from Jason Fesler, which reported a score of 10/10. However, I also found an interesting test at ipv6-test.com which warned me I was using SLAAC without privacy extensions.
I didn’t have any idea about what that meant, so I read a bit more about it. It turns out there are 3 normal ways a computer can get an IPv6 address. The first one is static assignment, like in IPv4. The second one is DHCPv6, which is similar to normal DHCP. The third one achieves the same but it’s a “native” standardized mechanism called SLAAC.
IPv6 requires all network interfaces to have a link-local address in addition to other IPv6 addresses they may have. With IPv6 it’s a given a network interface will have multiple addresses assigned. This link-local address starts with prefix “fe80”. Link-local addresses are very similar in concept to both the Ethernet MAC address (and in Ethernet interfaces it’s usually derived from it) and a local IPv4 address. The difference with the latter is link-local addresses are not routable.
Imagine your computer has two network interfaces. The first one has a link-local address with value fe80::1, and the second one has fe80::2. You have a second computer connected with a network cable to one of those interfaces, and its link-local address is fe80::3. If you try to contact fe80::3 (e.g. by trying to SSH into it), which one should be the outgoing interface and your local address in those packets? You don’t know. Fortunately, while not recommended, a lot of software out there lets you use link-local addresses to contact other computers by appending a percent sign and the name of the network interface you want to go out from, like fe80::3%enp3s0 (if enp3s0 is the name of the network interface you want to use to reach that address).
But I digress. Link-local addresses are also used to be able to send IPv6 packets from network interfaces automatically without having another, possibly public, address assigned yet. Using these link-local addresses, you can use SLAAC to send router solicitation requests and routers in your link neighborhood may reply with a prefix assignment you can use to create an additional globally routable address for your interface. At this point you’d normally have two IPv6 addresses assigned to your network interface: link-local and global.
Normally, routers assign a /64 prefix to your computer, and your computer fills the last remaining 64 bits in the address with something derived from the Ethernet MAC address. This is a privacy problem in today’s Internet. Because the way the last 64 bits are derived from the Ethernet MAC address, it’s possible for anyone to identify you and track you across ISPs, connections and services, without using HTTP cookies and without effort.
Enter Privacy Extensions. With them, the Ethernet MAC address will not be used to fill the remaining 64 bits in your assigned prefix to create the IPv6 address. It will be random and it will change every time the network interface is brought up, requesting an IPv6 prefix to the router.
In many Linux distributions this mechanism is not activated by default. At least in my Fedora installation, it was not. It should probably be used in most home desktops, laptops, phones and workstations.
The easiest way to use Privacy Extensions in Linux is by writing “2” to /proc/sys/net/ipv6/conf/default/use_tempaddr. This is normally achieved at boot time before the network interface is brought up by saving the following text to /etc/sysctl.conf or a new file in /etc/sysctl.d:
sysctl.d is probably the best mechanism if your distribution allows it because your settings will survive system upgrades without having to manually merge file contents.
According to the Linux kernel documentation, a value of 0 disables Privacy Extensions, a value of 1 enables Privacy Extensions but prefers public addresses to temporary addresses. A value greater than 1 enables Privacy Extensions and gives preference to the temporary address when creating connections. Hence using 2 as the value.
After enabling these Privacy Extensions, you’ll notice your public address doesn’t disappear from the interface. Instead, a third IPv6 address is added to it and used by default.
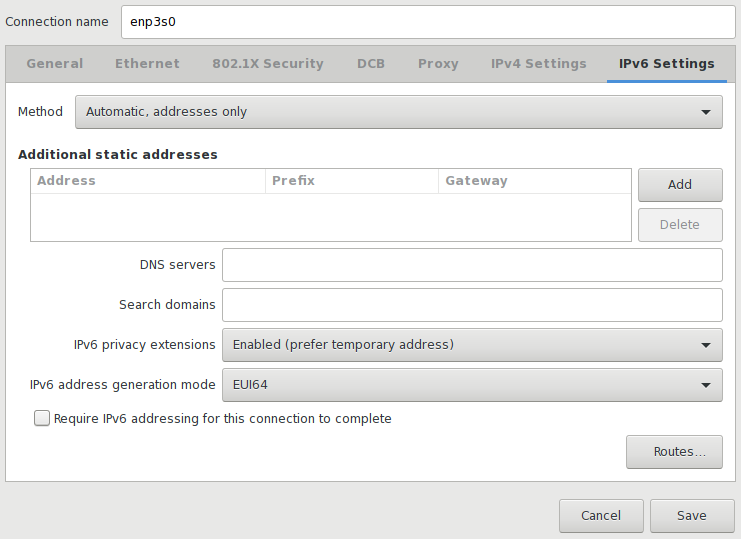
If you let NetworkManager handle your IPv6 settings, it will interfere and probably ignore the sysctl parameter above. In any case, I think it’s useful to have it there as a fallback. If you tell NetworkManager to ignore the IPv6 part of your connection, the sysctl parameter will kick in. Otherwise, the easiest way to achieve the same effect is using a GUI like nm-connection-editor and setting “IPv6 privacy extensions” to “Enabled (prefer temporary address)” and “IPv6 address generation mode” to “EUI64”, but you could also set the latter to “Stable privacy” and neither public address would be derived from the Ethernet MAC address, with one being temporary and another one being stable.
Most Android phones have Privacy Extensions enabled. If your home network has WiFi access and your phone uses it, you can make sure Privacy Extensions are enabled by visiting ipv6-test.com from it, but you can also check if your phone has 3 different IPv6 addresses in Settings > About phone > Status > IP address.
I also made some small adjustments to other settings, like using IPv6 DNS servers by default. Both Cloudflare’s 1.1.1.1/1.0.0.1 and Google’s 8.8.8.8/8.8.4.4 public DNS servers have IPv6 counterparts you can use.
I could talk about a few more details but this post is long enough already, so I can only wrap it up by saying I’m really happy to see IPv6 adoption expanding in Spain and being part of it. At the same time I’m surprised at how seamless and transparent the transition to IPv6 is being for many people all over the world, so congratulations to all those sysadmins and engineers behind it.
Load comments