Digitalizing vinyl discs
I recently became interested in the topic of digitalizing vinyl discs to copy the music my family had in that format to a digital storage like the hard drive in my PC, an iPod or a CD. Doing it is actually very simple, but the amount of specialized devices, some of them with very steep prices, cables and connectors make it look much harder. I will try to condense here the knowledge I’ve been gathering after reading several websites and listening to several experts on TV and radio shows.
Expensive hardware and software not needed
It is probably hard to make the creator of a 120 euros device admit that the device they are selling doesn’t do miracles and isn’t really worth it unless you are a professional, but they should admit it. You may find these devices on music equipment catalogs from time to time, available for purchase by the general public, and bragging about how they can record music taking 64-bits floating point samples at 96 KHz, convert them to MP3 on the file and transferring them to your PC easily.
And then we also have expensive audio processing software capable of removing noise, clicks and, again in general, doing impossible miracles to improve the audio quality of your audio files when post-processing them after they have been recorded from your vinyl discs.
Now, I’ll tell you something obvious and intuitive everybody already knows or supposes, but let’s make it clear: No device or sophisticated algorithm beats cleaning the vinyl discs. That’s right, let’s repeat it again. You can buy expensive hardware and expensive software and spend hours cleaning your recordings and removing clicks and noises and hums and whatever. But nothing is as time-efficient and quality-efficient as cleaning your vinyl discs and your turntable. 99% of the final quality depends on this, and miracles don’t exist.
What you need
-
A turntable (obvious) connected to an amplifier. Most people don’t have a turntable alone. If you used to listen to music in vinyl, where did you connect your speakers or headphones? Where did you change the volume? That’s the amplifier. It takes the music signal from the turntable and amplifies it to send it to the speakers, among other tasks.
-
A computer with a line-in jack. Most computers and soundcards nowadays have this. My cheap Realtek integrated soundcard has a line-in jack. The line-in jack is usually represented or marked as a group of parenthesis with an arrow crossing them and pointing inside. Ugly text representation:
←-. -
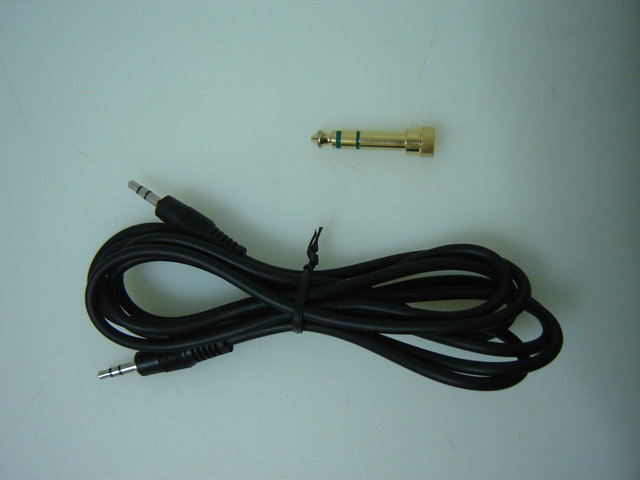
A cable to connect the amplifier to your PC. The connectors in the cable endings depend on how your are going to connect the amplifier to the computer, but there are only two possibilities in general. It will be either an rca-to-jack cable in the best case (we will clarify that) or a jack-to-jack cable in the worst case. None of those cables should cost more than 5 euros, and should be available in any music equipment shop. I bought a jack-to-jack cable for other purposes some days ago and its price was 2.5 euros.
-
Two pieces of software which are a mixer that should let you adjust the volume of the different soundcard components (Windows mixer, kmix, amix, alsamixer, etc…) and a recording program. There are many decent and free recording/edition programs out there, like Audacity, rec (from SoX), arecord and others.
As you see, the total software cost could be zero and the total hardware cost below 5 euros.
Connecting your equipment
Probably, you already have your turntable connected to your amplifier, and some speakers connected to the amplifier. Now you need to connect the amplifier to the computer’s like-in jack, which is probably a small audio jack, so one of the cable endings should have a small audio jack. So the next question is where to connect the cable to, in the amplifier. There are three possibilities.
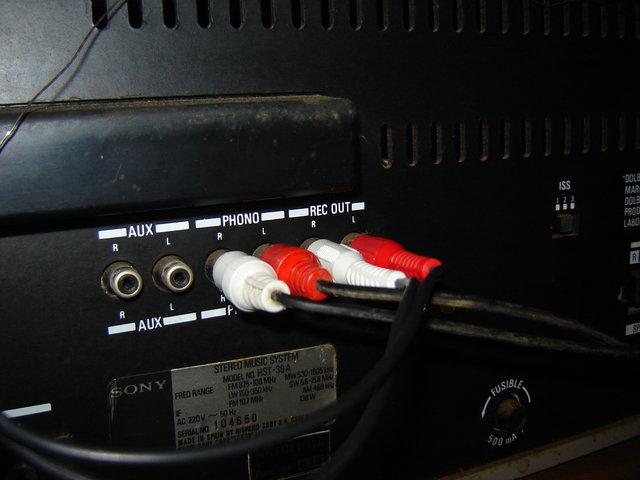
Safe bet: Rec-Out
You should first check if your amplifier has "Rec-Out" plugs. Sometimes, these are tagged with other words like "Line-Out" or "Tape-Out". Do not confuse them with "Audio-Out" or "Headphones". Probably, they are in the back of the amplifier if they exist, and next or near the plugs you use to connect the turntable to the amplifier. If they exist, they are probably RCA connectors, so you need an RCA-to-Jack cable.
This is the safe bet because the signal you get from those connectors has a standarized level, independent of the amplifier volume settings, and it’s safe to connect that to the computer’s line-in. Nothing should break or burn.
Unsafe bet: Headphones
If you have bad luck and your amplifier doesn’t have "Rec-Out", you could still use the headphones plug to get the audio signal. However, this is unsafe because the signal level, the intensity of the electrical flow going through the cable and into the sound card, depends on the volume settings in the amplifier, and it can be very high. High enough to damage the computer’s sound card, specifically. Still, if you set the volume to zero and then increase it very slowly, your card will probably be alright, but be very careful. I used this connection in one of my tests and everything was fine setting a volume close to zero. I didn’t fry my sound card, but it’s your risk. You would need a Jack-to-Jack cable, and optionally a big-jack to small-jack adapter if the headphones output is the big one and your cable has the small one. These are also very cheap.
No-no bet: Audio-Out
Never use these plugs. It’s meant for speakers, and you will probably damage your sound card. Did I already mention you shouldn’t use Audio-Out? Sorry, sometimes my memory fails and I don’t remember if I said that you shouldn’t use Audio-Out. By the way, you shouldn’t use Audio-Out.
Minimizing noise, clicks and jumps
I would recommend to wash your vinyl discs before recording their audio. You can wash them with water, neutral soap and your bare fingers, and I think it’s better to let them dry and maybe use a hair drier if it has a mode to blow cool air instead of hot air. If you dry the final drops or the whole disc with something like a towel or another piece of fabric you must do it softly and making sure it doesn’t leave any fabric trails behind.
You can also clean your turntable to remove dust and being careful enough not to damage it. Some turntables also let you tune the rotating speed. Mine for example lets me select between 45 and 33 1/3 revolutions per minute, but in any of those two modes I can also fine-tune the rotating speed. The rotating platforms has some marks in the side and an orange light. According to my manual, the optimum speed is when the bottom side marks appear not to move while the platform rotates. Maybe your turntable has something like this. Read its manual, if you still have it, for more details.
Finally, make sure your turntable’s ground cable is connected to a ground connector. Most amplifiers have one in the back. I mention this because I was getting a constant background noise and I didn’t know what was going on until I detected the free cable and saw the noise changing when I touched the cable ending. Chances are your turntable is already properly connected to the amplifier, but I had to mention it. There is also an uncommon but weird problem with looped ground connections. I read it mentioned in the Audiotoolers website. See the reference links for more details if you have a background noise problem.
Preparing your software
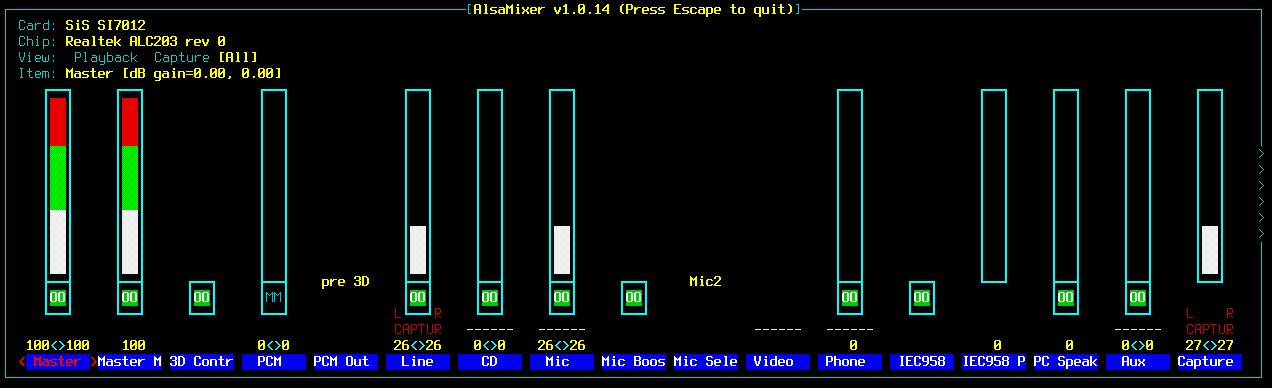
You should use the mixer to tell the card to record from the line-in connection instead of the microphone connection or other sources. The recording volume must be low in general. This part is a bit tricky. For example, my card has a line-in volume level. If I don’t mute the line-in, I would hear what comes through the line-in in the computer’s headphones or speakers, but this level doesn’t really match the recording level, which, in my soundcard, is controlled apart. So the only way to properly verify the audio volume was right was to perform a test record and then playing what I recorded.
If you set the recording volume too high, the signal will be saturated and it will sound no better than horrible. Just for reference, my settings had the capture (record) level to around 25% in both the line-in and capture controls. Do not take my numbers as a reference, but start with something of low volume and go increasing slowly. Do a test record and play it to verify the volume is fine. If you used the headphones connection, those are two different volume controls already and you must balance them, setting both to low levels if possible, specially the one in the amplifier as we mentioned previously.
Record
To test the volume and record in general, use a recording application like the ones I mentioned above. I’d record in Stereo mode, with 16-bit samples and at 44100 Hz. This is the type of sound that CDs use. Save what you record to WAV format and you will be able to easily burn an audio CD with it, or convert them to MP3 later to use with in your iPod or similar. Please refer to the recording application manual and documentation to find out how to indicate these parameters. Depending on the application you use, it may be easier to play the disc and store the full side audio on a file and then split it into chunks or split it while you record and listen to your discs.
Advanced trick
One of the guides I found online also mentioned the possibility of increasing the recording quality by wetting the disc’s surface with a mix of 75% water and 25% of alcohol, using a spray gun. It is a known method to remove more background noise, but some people are against it, and it has some drawbacks. For example, if the turntable isn’t well isolated, maybe the mix will slip inside the turntable and damage its circuits, and the alcohol can also dissolve the glue that attaches the diamond nail to the arm. The discs would also need to be cleaned after being recorded, because when domestic alcohol evaporates after some minutes or hours, it leaves traces behind in the disc surface of other substances, and they are a problem. I didn’t use this trick, but if you decide to use it, mail me commenting your results, please.