#!/bin/sh

usage_and_exit() {
    echo "Usage: $0 [-d density] LATEX_FORMULA_FILE ..." 1>&2
    exit 1
}

formula_file_to_png() {
    # File names taking part of this
    texfile="${1}.tex"
    dvifile="${1}.dvi"
    epsfile="${1}.eps"
    pngfile="${1}.png"
    auxfile="${1}.aux"
    logfile="${1}.log"

 test -f "$1" -a -s "$1"
    if test $? -ne 0; then
        echo "Skipping ${1} ..."
        return 1
    fi

 echo -n "Creating ${pngfile} ..."

 # Create complete TeX file with formula
    cat 2>/dev/null >"$texfile" <<-EOF
    \\documentclass{article}
    \\pagestyle{empty}
    \\usepackage{euler}
    \\begin{document}

 \\[ $( cat "$1" ) \\]

 \\end{document}
    EOF

 # Generate DVI -> EPS -> PNG
    latex "$texfile" </dev/null >/dev/null 2>/dev/null \
    && dvips -D 72 -E "$dvifile" -o "$epsfile" >/dev/null 2>/dev/null \
    && convert -units PixelsPerInch -density "$density" "$epsfile" "$pngfile" 2>/dev/null \
    && rm -f "$texfile" "$dvifile" "$epsfile" "$auxfile" "$logfile"

 if test $? -ne 0; then
        echo " failed"
        return 1
    fi
    echo " done"
    return 0
}

if test "$1" == "-d"; then
    shift
    density="$1"
    shift || usage_and_exit
else
    density=1200x1200
fi

if test $# -lt 1; then
    usage_and_exit
fi

echo "Density: $density"
while test $# -ne 0; do
    formula_file_to_png "$1"
    shift
done
Formulae to raster images
Related to the previous post, AsciiDoc is missing a feature some people will consider important, which is the ability to include formulas as part of any document. It features ASCIIMathML, a JavaScript trick that allows it to transform mathematical formulae in plain text to HTML code representing it. This option, however, is only available using the "xhtml11" backend and there are no other methods, at least for now. David Jones also mentioned MathTran, which can be used for similar purposes with (X)HTML backends.
If you want to include your mathematical formulae in any type of document, one of the best options is to convert the formulae to a raster PNG image and include them in the document as an image.
After Googling a little bit trying to find a program that would simply convert a formula to PNG or GIF or another raster format, I found several scripts to do the job. The general procedure is described as follows:
-
Write the formula using LaTeX notation.
-
Embed it in a temporary file containing a full LaTeX document.
-
Process that file with LaTeX to produce DVI output.
-
Convert the DVI to EPS using the "dvips" command.
-
Convert the resulting EPS to PNG using ImageMagick’s "convert" tool.
I copied one of them to my computer and tried to use it, but it didn’t work as I expected. This is because I was interested in DocBook output instead of (X)HTML, so I tried to create very big image files so when embedded in the final PDF the formula would have enough quality to be printed as part of the rest of the text without anyone noticing the pixels. Using the scripts I found on the net, I was able to create very big images, yet when embedded in the final PDF they looked giantic. Even a normal image would look too big and pixelated.
I tracked the problem down to being an issue with the density of the image. The density or resolution of the image, as opposed to its size, is a metadata field that can be specified in some image formats (PNG being one of them) that registers the number of pixels in the image that must be used per physical measure unit when putting the image on a physical medium. Typically, it’s given in pixels per inch. In the procedure described previously, you can see that we are working with a vectorial image until the last step, in which it’s converted to a raster format. It’s in this last step when you specify the image density. In theory, when you specify a large density like 1200x1200 for printed output, that density is recorded as part of the PNG image. Most scripts out there, however, forget to pass an additional parameter to the "convert" tool, called "-units", to specify the units of the image resolution. This option is mandatory to get the expected result automatically when embedding the image in a DocBook document and generating the final PDF using "fop". You can view the horizontal and vertical resolution of a PNG image using the "identify" tool from ImageMagick.
identify -format 'H: %x\nV: %y' sample_equation.png
If the image has been correctly generated, you should see something like this:
H: 472.44 PixelsPerCentimeter V: 472.44 PixelsPerCentimeter
On the other hand, when you have forgotten to specify the units in a 1200x1200 ppi conversion, you will see the units are undefined:
H: 1200 Undefined V: 1200 Undefined
Such an image will not be displayed properly when embedding it in a PDF document.
As a result of this, I created my own script to convert formulae to raster images. As input, it needs a list of files with formulae you want to convert, one per file, in LaTeX format.
Source code (public domain)
Example
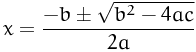
You can find many guides online if you are unfamiliarized with the LaTeX formulae notation. See for example the contents of sample_equation:
x = \frac{-b \pm \sqrt{b^{2} - 4ac}}{2a}
If you save the previous script to a file named formula2png in your PATH, you would run something like:
$ formula2png sample_equation
Density: 1200x1200
Creating sample_equation.png ... done
The default density is 1200x1200, more than enough for the formula to be printed flawlessly in a home inkjet or even laser printer. You can modify the image density (and get a smaller image suitable for the web if you prefer) by using the -d script option, like:
$ formula2png -d 150x150 sample_equation
This is the output using a density of 150x150:
Remarks
Some similar scripts out there use additional "convert" options like "-trim" (which I found unneeded) and "-transparent #FFFFFF" to make the white color transparent and get a transparent background image. This, at least in my case and probably everyone else’s, doesn’t work as expected. Only the completely white pixels are made transparent. As "convert" blurs the font borders a little bit to make them look good, the text is surrounded by a narrow almost-white border that looks wrong if you put the image on a non-white background. That’s why I didn’t bother and generate white background images.
I also tried to use a tool present in my system, called "dvipng" to translate the LaTeX DVI output directly to PNG. It works fine but the resulting image has big white margins with the formula located in the bottom right corner of the image. When you translate the DVI document to EPS you avoid this, as the generated EPS file has strictly the needed margins, so I kept the original method. If you want to use "dvipng" you would need to run ImageMagick’s "convert" or "mogrify" tool on the resulting image, using the "-trim" option, which would be useful in this case.
Load comments